
How I Wi-fi remote-controlled our Honda generator. And Why…
Why even have a generator? For the longest time, I quietly boycotted them. They consume $1.30 to produce 1kWh of power. Our solar panels make that in an hour of silence… In all our years of Overlanding, there have only been 2 times where we really would have used it. Once in Tuktoyaktuk at the Arctic Ocean, Where the sun just skipped around the horizon and the locals had their solar panels mounted on the south-facing side of their house. The second was in Guatemala in the coastal rainforest during the rainy season. Everything was hot and sticky and We needed to run the air conditioner just to sleep. Fortunately, we had enough battery to make it a few days in this climate…


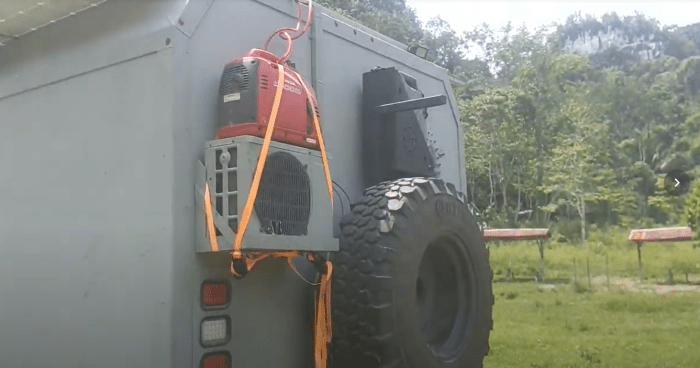
As we passed near Guatemala City, one of our subscribers named Carlos, came out for a visit and I learned he had this Honda generator for sale. The price was right so I snapped it up. In the following weeks, I put about 30 hours on it just running the air conditioner for a bit in the evening and putting a little bit of charge into the batteries under the thick forest canopy.
But because I hate the obnoxious drone of generators, I would usually lock it to a tree some distance away from our camper truck. Then when it came time to shut down the generator I needed to get out of bed, and stumble outside to switch this thing off.
Additionally, I would sometimes forget to enable or disable Eco-Mode – which needs to be set depending on the load, our air conditioner doesn’t like starting when Eco-Mode is enabled. And so the idea was hatched, use an inexpensive ESP8266 microcontroller, a couple of relays, and be able to remotely shut down the generator, or toggle the Eco Mode.
Further this would allow the automation system in the truck to trigger the shutdown as well, for example, I can start the generator, to power the battery charger until the batteries reach 85% and then the automation can automatically shut down the generator.
So I got out my electronics bin and dug out:
- Wemos D1 Mini (ESP8266)
- 2x Wemos Relay shields
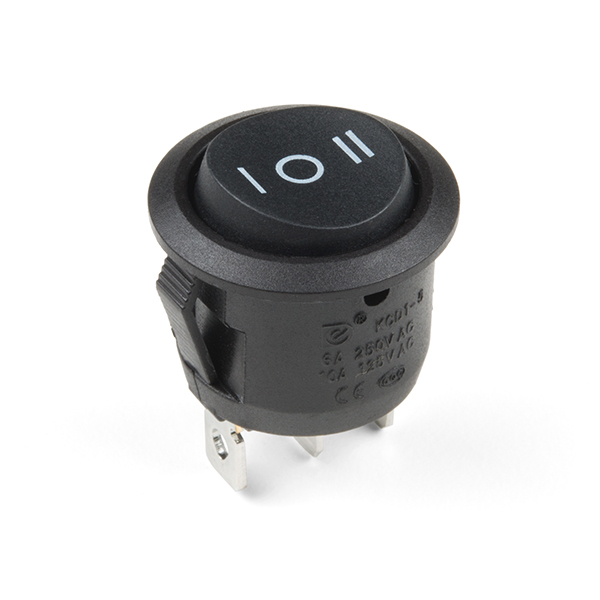
- 3 Position Switch (like these)
I’d seen another cottage industry remote control product for sale that had a rechargeable battery and a plug-in wall wart that would recharge the said battery, it used a typical 315mhz key fob remote control. But I wanted mine wired internally, without the need of plugging in attachments each time I wanted to use it. I wanted to have the whole thing self contained inside the generator, and powered from the generator itself. I had a Recom 5v switching power supply in my parts bin, and it has a 72V input rating (🤯). This was going to be perfect, because I was expecting the unregulated output to be noisy, full of AC garbage and voltages ranging from 12 to 35 volts DC.
In my initial testing, it worked great! 5.001 VDC and 0.001 VAC – They do a great job of cleaning up the power. And my single relay and Wemos worked like a champ during testing so I started filming the video. However as you saw in the video, when both relays were actuated at the same time, it was slightly over the 500mA rating of the little power supply and it started dropping out. Voltage dropped to 4.3VDC or less. So in the end I conceded to using a 1A wall wart power supply and wiring it to the back of the AC outlet.
REPLACING the Kill-Switch
Next thing to talk about is the Kill-Switch. A common modification of these generators is to relocate the engine shutdown switch from the fuel selector valve to the top near the handle. This decouples the switch from the valve and allows you to turn off the fuel without killing the spark for the engine. This causes the engine to run for a couple more minutes and uses up the rest of the fuel in the carburetor bowl. They say that this prevents the fuel from gumming up and tarnishing the carburetor.
The previous owner had already done this mod, so I just needed to replace the two-position SPST switch with this three-position SPDT switch.
This switch is an On-Off-On switch, meaning it has 2 on positions at the left and right and Off in the middle. This will allow us to wire position 1 to manually shutdown the engine. The Off position will allow the generator to run. And the The 2nd position will “ARM” the remote shutdown relay. It’s simply wired in series with the normally closed (NC) contacts on the relay.
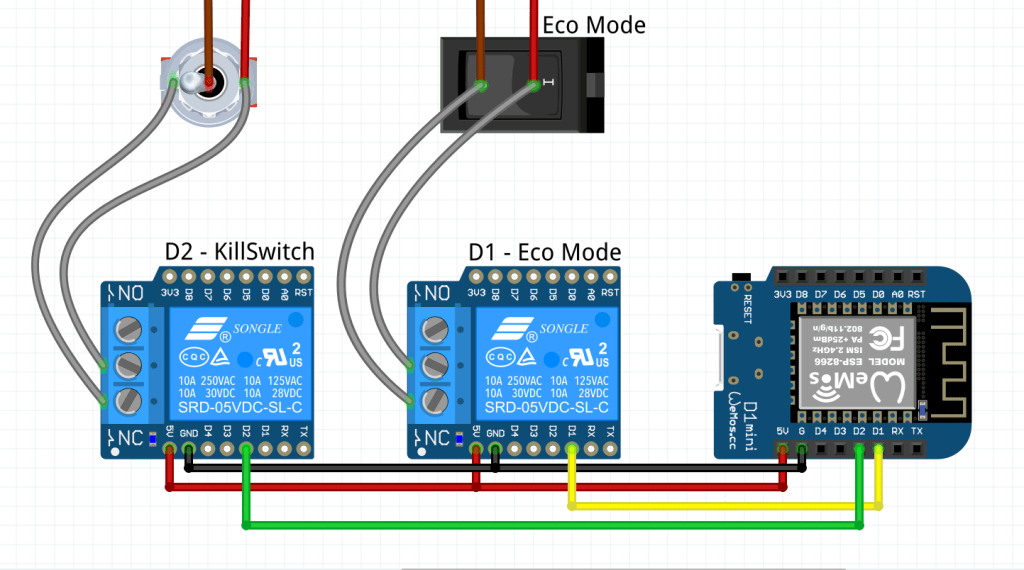
Next we wire everything up as shown in the diagram below. The Wemos Modules are wired as simply as they would be stacked… The switches wired as shown… And you’ll need to source a 5V power source from somewhere, either a more robust DC-DC power converter/regulator, or a hacked up wall adaptor as I’ve done.

Next thing of course is the code, As I said in the video, we have a Blynk server running in the truck on a Pi cluster, and that makes it easy for me to use that. But there is also a WiFi Access Point Version of the control below. FIrst thing if you want to use Blynk is to install the Blynk App (legacy) (Google Play Store) or (Apple App Store). And then scan the QR code to the Left. This should clone my App project into your Blynk App.
Then you’ll need to copy your unique “Auth Code” from the App and paste it onto the Arduino Sketch below. You’ll also need to enter your Wi-Fi credentials.
I’ve highlighted the lines that will need your attention.
/*
 * Sketch: ESP8266_Generator_Control_Blynk
 * Control an Honda Generator using the Blynk App
 * Intended to be run on an ESP8266
 *
 * Install the Blynk App on your smartphone and scan the QR code.
 *
 */

#define BLYNK_PRINT Serial    // Comment this out to disable prints and save space
#include <ESP8266WiFi.h>
#include <ArduinoOTA.h>
#include <WiFiUdp.h>

#include <BlynkSimpleEsp8266.h>

#define VPIN_HOUR_METER  V4
#define VPIN_OIL_METER  V3
#define VPIN_RUN_TIME  V7

BlynkTimer timer;

// constants won't change. They're used here to set pin numbers:
const int RunRelay = D1;
const int EcoRelay = D2;

volatile unsigned long second_timer = 0;  // Allows schedule to spread various operations over 1 minute
float hour_meter;
float oil_meter;
float run_time;
float temp = 0;
int RPM = 0;

// You should get Auth Token in the Blynk App.
// Go to the Project Settings (nut icon).
char auth[] = "Your-Auth-Code-Here";

// Your WiFi credentials.
// Set password to "" for open networks.
char ssid[] = "Your-WiFi-Name";
char pass[] = "Your-WiFI-Password";

void setup()
{
  pinMode(RunRelay, OUTPUT);
  pinMode(EcoRelay, OUTPUT);

  timer.setInterval(1000L, Schedule); // Runs schedule once per second

  digitalWrite(RunRelay, HIGH); //This forces the default state on start0, LOW or FALSE or 0 (off)
  digitalWrite(EcoRelay, HIGH); //This forces the default state on start0, LOW or FALSE or 0 (off)

  Serial.begin(115200); //Not really needed, Sets 0 the serial debug port.
  //Blynk.begin(auth, ssid, pass);  //Use this line if you are using the Blynk Cloud Server
  Blynk.begin(auth, ssid, pass, "192.168.10.200", 8080); //Use this line if you are using a Local Blynk Server
  Blynk.virtualWrite(V1, 1); //Turn on the Run Switch in the GUI
  Blynk.virtualWrite(V2, 1); //Turn Off the ECO Switch in the GUI
  Blynk.virtualWrite(V6, 782); //Fake RPM for now...
  Blynk.virtualWrite(V5, 58); //Fake a Temp
  Blynk.virtualWrite(VPIN_RUN_TIME, 0);

  Blynk.syncAll();

  // Hostname defaults to esp8266-[ChipID]
  ArduinoOTA.setHostname("Blynk Wemos Honda Generator");

  ArduinoOTA.onStart([]() {
    Serial.println("Start");
  });
  ArduinoOTA.onEnd([]() {
    Serial.println("\nEnd");
  });
  ArduinoOTA.onProgress([](unsigned int progress, unsigned int total) {
    Serial.printf("Progress: %u%%\r", (progress / (total / 100)));
  });
  ArduinoOTA.onError([](ota_error_t error) {
    Serial.printf("Error[%u]: ", error);
    if (error == OTA_AUTH_ERROR) Serial.println("Auth Failed");
    else if (error == OTA_BEGIN_ERROR) Serial.println("Begin Failed");
    else if (error == OTA_CONNECT_ERROR) Serial.println("Connect Failed");
    else if (error == OTA_RECEIVE_ERROR) Serial.println("Receive Failed");
    else if (error == OTA_END_ERROR) Serial.println("End Failed");
  });
  ArduinoOTA.begin();
  Serial.println("Ready");
  Serial.print("IP address: ");
  Serial.println(WiFi.localIP());
}

BLYNK_WRITE(VPIN_HOUR_METER)
{
  hour_meter = param.asFloat();
}

BLYNK_WRITE(VPIN_OIL_METER)
{
  oil_meter = param.asFloat();
}


BLYNK_WRITE(V1) // The Power Button, Killswitch -
{
  if (param.asInt() == 0) {
    Blynk.virtualWrite(V2, 0); //Turn Off Eco Mode in the GUI for Fun
    Blynk.virtualWrite(V6, 0); //Kill The RPM Gauge
    Blynk.virtualWrite(V5, 28); //Fake a Temp for now
    digitalWrite(RunRelay, LOW); //Engauge the relay to Stop the Engine
    //
    // the device should loose power after this
    //
  }
  if (param.asInt() == 1) {
    Blynk.virtualWrite(V6, 1); //Kill The RPM Gauge
    Blynk.virtualWrite(V5, 28); //Fake a Temp for now
    digitalWrite(RunRelay, HIGH); //Engauge the relay to restart the Engine
  }
}

BLYNK_WRITE(V2) // Eco Switch
{
  if (param.asInt() == 1)
  {
    digitalWrite(EcoRelay, HIGH); //Save some fuel
    Blynk.virtualWrite(V5, 45); //Fake a Temp
    Blynk.virtualWrite(V6, 512); //Fake RPM for now...


  }
  if (param.asInt() == 0)
  {
    digitalWrite(EcoRelay, LOW); //Alls Out!
    Blynk.virtualWrite(V5, 58); //Fake a Temp
    Blynk.virtualWrite(V6, 768); //Fake RPM for now...

  }

}

void Schedule()
{
  second_timer++;
  Serial.println(hour_meter);
  Serial.println(second_timer);


  if (second_timer > 59 )
  {
    Blynk.syncVirtual(VPIN_HOUR_METER, VPIN_OIL_METER);//gets last known value of virtual pins

    hour_meter = hour_meter + 0.016666667;
    Blynk.virtualWrite(VPIN_HOUR_METER, hour_meter);

    oil_meter = oil_meter + 0.016666667;
    Blynk.virtualWrite(VPIN_OIL_METER, oil_meter);

    run_time = run_time + 0.016666667;
    Blynk.virtualWrite(VPIN_RUN_TIME, run_time);

    second_timer = 0;
  }
}


void loop()
{
  Blynk.run();
  ArduinoOTA.handle();
  timer.run();
}
Simpler Wi-Fi Hotspot version using an Access Point and a Web Browser.
/*
 * Sketch: ESP8266_Generator_Control_Web
 * Control an Honda Generator from a web browser
 * Intended to be run on an ESP8266 but ESP32 would work fine too.
 *
 * connect to the ESP8266 WiFi "Honda EU1000i" then
 * use web browser to go to http://192.168.4.1
 *
 */


#include <ESP8266WiFi.h>
const char WiFiPassword[] = "12345678";
const char AP_NameChar[] = "Honda EU1000i" ;

WiFiServer server(80); #This is the port, normally 80 is used for web.

String header = "HTTP/1.1 200 OK\r\nContent-Type: text/html\r\n\r\n";
String html_1 = "<!DOCTYPE html><html><head><meta name='viewport' content='width=device-width, initial-scale=1.0'/><meta charset='utf-8'><style>body {font-size:140%;} {font-family: Arial, Helvetica, sans-serif;} #main {display: table; margin: auto;  padding: 0 10px 0 10px; } h2,{text-align:center; } .button { padding:10px 10px 10px 10px; width:100%;  background-color: #4CAF50; font-size: 120%;} .redbutton { padding:10px 10px 10px 10px; width:100%;  background-color: #FF0000; font-size: 120%;}</style><title>Honda EU1000i</title></head><body><div id='main'><h2>Honda EU1000i</h2>";
String html_2 = "<form id='F1' action='ECOON'><input class='button' type='submit' value='Eco Mode ON' ></form><br>";
String html_3 = "<form id='F2' action='ECOOFF'><input class='button' type='submit' value='Eco Mode OFF' ></form><br>";
String html_6 = "<form id='F2' action='POWEROFF'><input class='redbutton' type='submit' value='Power OFF' ></form><br>";
String html_4 = "</div></body></html>";

String request = "";
int Kill_Pin = D1;
int Eco_Pin = D2;


void setup()
{
    pinMode(Kill_Pin, OUTPUT);
    pinMode(Eco_Pin, OUTPUT);
    digitalWrite(Eco_Pin, HIGH);
    digitalWrite(Kill_Pin, HIGH);


    boolean conn = WiFi.softAP(AP_NameChar, WiFiPassword);
    server.begin();

} // void setup()


void loop()
{

    // Check if a client has connected
    WiFiClient client = server.available();
    if (!client)  {  return;  }

    // Read the first line of the request
    request = client.readStringUntil('\r');

    if       ( request.indexOf("POWERON") > 0 )  { digitalWrite(Kill_Pin, HIGH);  }
    else if  ( request.indexOf("POWEROFF") > 0 ) { digitalWrite(Kill_Pin, LOW);   }
    else if  ( request.indexOf("ECOON") > 0 ) { digitalWrite(Eco_Pin, HIGH);   }
    else if  ( request.indexOf("ECOOFF") > 0 ) { digitalWrite(Eco_Pin, LOW);   }

    client.flush();

    client.print( header );
    client.print( html_1 );
    client.print( html_2 );
    client.print( html_3 );
    client.print( html_6 );
    client.print( html_4);

    delay(5);
  // The client will actually be disconnected when the function returns and 'client' object is destroyed

} // void loop()

Hola,
Muchas gracias por tus consejos, es un privilegio poder aprender de tu canal,
un saludo
Ramón
LikeLike