
It always seems to amaze people when we pull out our phone, sigh a breath of relief, and say something like “Oh Good, My Dog’s not Dead!” Being able to remotely check in our perrito while hiking a Piramide brings a little extra comfort knowing doggo is okay.

The topic of automation is something I get asked about a lot in YouTube comments. Unfortunately it goes something like “How do you do all that automation stuff?” It’s a broad question, quite outside the scope of a reply to a comment. Even in a single video it would be tough to lay it all out. So in this post I hope to outline one aspect of the automation, and that is remote monitoring various vitals of the truck.
I’ve often received compliments for “Inventing” this or that, But I don’t feel I’ve invented something so much as mixed the mortar that locks all the building blocks together to build a great Piramide. 😊
But first a preface: being able to access this stuff remotely depends on the truck having a data connection to the outside world, We use a MoFi LTE Router that has a Sim Card with a basic data package. I won’t go into a ton of detail here, suffice to say that our truck has a WiFi hotspot around it at all times. We made a terrible video on it here:
The next building block is a Raspberry Pi 3, a credit card sized computer that runs off of 5 volt USB, has built in WiFi, Bluetooth, 4 USB’s, HDMI Video and cost $35. We have a few of them scattered around the truck, doing various tasks. There are newer faster versions out now, But even the $10 Raspberry Pi Zero would work fine for this very light duty task.
While this post can’t go into step by step details, of the full installation, it will give you the right search terms to Google to find the answers you need. That being said, you’ll need to download the latest version of Raspbian and flash it to a Micro SD Card. Boot it up and join your WiFi network. Ya got’r’done? Great, Now you have a micro computer waiting to do your bidding.
The next building block is a Smartphone App called Blynk, it’s available for Android and iOS and it is the “LEGO” of smartphone apps. You can switch it to edit mode, add or move displays, graphs, buttons and other controls. This was a Kickstarter project back in the day and we’re proud to have brought this to life. Anyway, get that installed and play around a bit, they give you credits to “buy” more buttons and graphs, but the free included amount is plenty for a basic project.
Then the mortar that glues it all together – the Raspberry Pi to the Blynk App – “Python”, it’s a scripting language that may seem daunting at first, but fear not, it’s built into Raspbian and it is very popular so there are plenty of free resources and example snippets of code online to get most things done. A very basic Python Script may look like this.
!/usr/bin/python

import RPi.GPIO as GPIO
//Setup the IO

GPIO.setmode(GPIO.BCM)
LIGHTS = 16
GPIO.setup(LIGHTS, GPIO.OUT)

GPIO.output(LIGHTS, True)

exit()
This is a simple script to turn on the lights and it’s triggered when we press F2 on our little wireless keyboard, we can also call it with a webhook via a Google Assistant Request.
“Okay Google, Turn on the Lights”
Back to the task at hand, you’ll need to install the Blynk libraries and then set up a cron job to run your script as often as you see fit, but here is an example of a temperature logging script that uses a DS1820 to sense the temperature in the room and then upload that to Blynk’s servers where you can later retrieve it with the Blink App.
#!/usr/bin/python
#!/usr/bin/env python

import os
import glob
import BlynkLib

BLYNK_AUTH = '12cbe0' #from the Blynk App

# Initialize Blynk
blynk = BlynkLib.Blynk(BLYNK_AUTH)

os.system('modprobe w1-gpio')
os.system('modprobe w1-therm')

#base_dir = '/sys/bus/w1/devices/'
#device_folder = glob.glob(base_dir + '28*')[0]
# Hard coded to below
device_file = '/sys/bus/w1/devices/28-011215515/w1_slave' #this is the Unique SN on the DS1820

def read_temp_raw():
    f = open(device_file, 'r')
    lines = f.readlines()
    f.close()
    return lines

def read_temp():
    lines = read_temp_raw()
    while lines[0].strip()[-3:] != 'YES':
        time.sleep(0.2)
        lines = read_temp_raw()
    equals_pos = lines[1].find('t=')
    if equals_pos != -1:
        temp_string = lines[1][equals_pos+2:]
        temp_c = float(temp_string) / 1000.0
        #temp_f = temp_c * 9.0 / 5.0 + 32.0 #For my American Homies
        return temp_c


print "Room Temp ",(read_temp())
blynk.virtual_write(120,read_temp())

blynk.run()
I know this post glosses over a lot of the details, so you’re going to have to do your homework. But I’ve shown you the books you have to read. If there is enough interest and supporting channel members, perhaps I can do a more in depth video in the future.
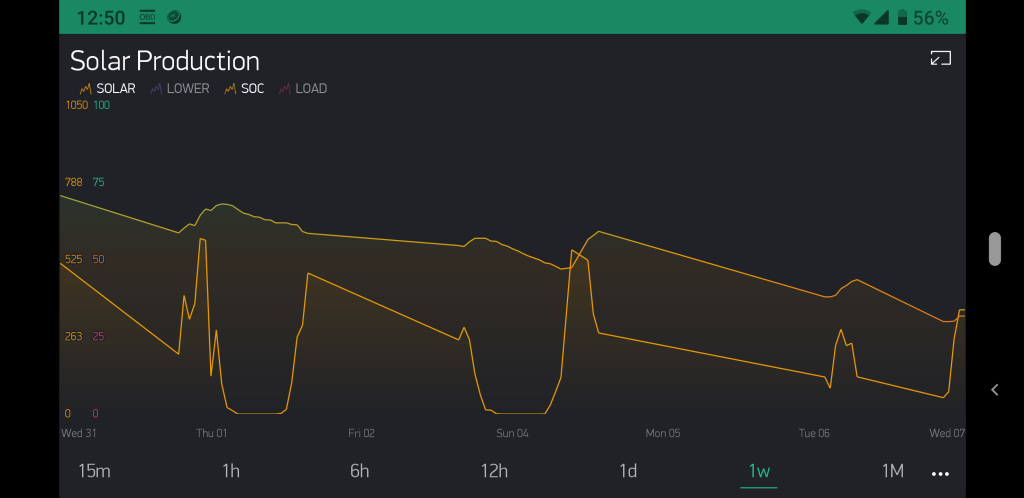
I will leave you with a Photo Montage of some of the screens of data I get access to right on our phones.


Hi guys this is pretty amazing I was just wondering how you stay connected over cellular when you are not in wifi range? Do you do this via webserver or can you directly contact your lte router?
Many thanks will follow your channel !
Rgds
Matthijs
LikeLike
It’s all server-side, the data and stats are sent over Wifi if available and LTE otherwise. Then the Blynk App gets it from the server to display it. We use both the Blynk server in the Cloud and a Local Installation for when we’re completely off-grid.
LikeLike
Jason, I was “streaming analytics” to Microsoft Azure to my “iot hub”
with one device and woke one morning to see my “forecast” charges
to be $10.00 CDN per day. So, in 3 months I have paid $30+$56+$77
for a simple experiment. I quickly shut down a portion of my “subscription”!
To “Blynk” your 4-page app how many “energy”
units did it consume? Sounds like it was cheaper than my MSFT experiment.
LikeLike
You could probably get away with it for with the included free credits, but I have maybe spent an extra $5 over the course of the last 5 years…
LikeLike
First, I would like to say, GREAT content! Thanks. Everything about your build and especially to technical aspects of the controls. Would enjoy more definition, especially with respect to using Webhooks. Since watching you video, I have been struggling to try to figure out the steps to get information from google assistant back to Blynk as you describe in turning on the fan, etc.
LikeLike
Just curious if it is possible to use a DS1820 with a Wemos D1 mini to get temperature in a similar fashion. I will start experimenting. Based on your guide for the Wemos D1 Mini I was able to successfully remotely turn on and off my inverter by hijacking the button. I am still working on my sketch. I have a seperate that I have successfully got to read the battery voltage using the A0 on the Wemos D1 Mini. I would like to combine these 2 efforts and get it to read temp then figure out to smartly turn things on and off. You have a very cool setup. I might dream to get there someday. I really like the slide out Solar Panels.
LikeLike
Sure, we have a bunch of them running…
LikeLike
I am going to give it a shot. I will admit my sketch writing or coding is horrible. Hopefully I will improve with time. I have gotten the read Voltage working decently with a voltage divider. I am connecting something like .8 volts to A0 pin and then just tuned my “maths” via someone else borrowed code and it is working relatively well, Just not pretty yet. I know their is a voltage divider built in and i tried a method to just use a 130K ohm resister but cooked 1 Wemos D1 Mini. Luckily they are not super expensive I think I paid $12 for 5 of them. I also took a few wrong turns figuring out how to get things to display in the blynk app so spent some money on energy to try other things but all in all pleased with the progress. I can turn my inverter on and off with voice commands to Alexa or via a button in the app. I used a velleman VMA406 as I happen to have one laying around versus building my own custom board with relays. Can I use any of the D0-8 pins for the temp sensor connected to DSB1820? Or does it also need the A0? I made a failed attempt at writing an If Else statement. I will revisit this at a later time. My inverter is power hungry at idle. I am also using a MOES Dual Power Controller as an ATS to switch between Mains Power and Inverter power in my shed. It keys off of VDC of the batteries. And it pays no attention to if their is inverter AC voltage present or not. I am struggling to make it and my inverter smarter than they actually are but is proving a bit smarter than I actually am…LOL but I will hopefully get their with some trial and error.
LikeLike
Hi Jason, you obviously have quite a few sensors and relays scattered around the truck. Do you use the Pi as a server, and use the WEMOS D1 Mini’s to read sensors and trigger relays? I am trying to think of the most efficient method for our build. Also, for the solar monitoring, are you pushing that information from the SBMS to Blynk? Thanks!
LikeLike
Yes, exactly…
LikeLike